


When winter comes around our birds don't have as much food available. Insects and fruits are in short supply so they rely on seeds. You can supplement their diet with fruit, dried mealworm, peanut butter, hulled peanuts, and seed.
This bird feeder is 10.25 inches tall. 5 inches deep and 8.5 inches wide. The feeder tray 1 inch deep, 6.5" long, and 4.5 inches wide. That is over 29 cubic inches for seed.
There is a hole near the peak on the front and back. Run a cord through these holes to hang the feeder.
I included a perch on each end of the feeder to accommodate the birds while feeding. The fretwork is open enough to give you a good view of the little fellows.
The feeder was cut from 1/4" Baltic birch plywood. You will also need 1/4" diameter wooden dowel for the perch.
For outdoor use, you should use a good exterior paint or a few coats of Spar Urethane. When hung completely exposed to the elements the feeder will not last forever but two or three years is a good goal. It will last longer if you maintain it each year.
Remember to use an exterior rated glue. Titebond II is water-resistant but Titebond III is waterproof. I have used both for outdoor projects and have seen Titebond II fail under harsh conditions.

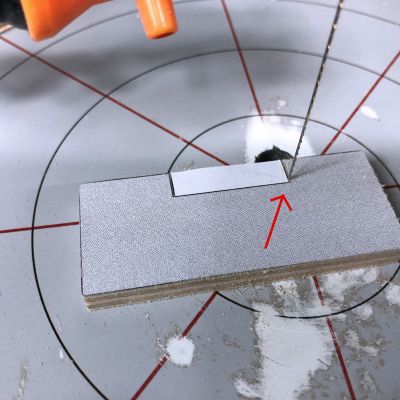
Cutting tight slot and tab joints on the scroll saw:
Sorry that there are so many pictures but I wanted to explain it well. I did not want to do a video because I think the pictures are easier to see than a video.

I use slot and tab joints is many of my patterns. When cut accurately they provide a strong joint with more glue surface than a butt joint.
When I know I need a tight joint I will use this technique. If you have trouble getting good joints then try this technique and see if it helps.
Let's start with the slot.

I am cutting across the slot. I will cut it separately.

The board is now ready to cut the slot.

I cut down one side of the slot. Notice that I am leaving the line. Cut just inside the line trying not to leave white. Back the blade out.
Move to the other side of the slot and repeat the last step. Back the blade out.

Cut a relief cut so you do not have to make a turn at the corner of the slot. We want square corners.

The relief cut is made and we are ready to cut across the slot.

Put the blade in the relief cut and complete the slot. One note here is that the slot needs to be as deep as the thickness of the board the tab is cut from. You can hold the board up to the pattern and see if the board is the exact thickness called for. If the board is thinner or thicker then adjust this cut.

We have a decently square slot cut with just a bit of the line showing.

Time to move on to the tab. Note that I left the tab uncut until I completed the rest of the cut. Again, we want square corners so I am going to avoid turning the blade.

Cut down one side of the tab. Leave the line. Back the blade out. Yes, this will make the tab and slot too tight. We will fix that later.

Move to the end of the board and cut to the last cut at the corner. Repeat for the other side of the tab.

We have left the line on both the slot and the tab. They ain't gonna fit.

That is what we want. It is easy to take off more wood but it is tough to add back what you have already cut away. We will sneak up on a snug fit.

I normally sneak up on the slot side of the joint but you can do this to either the slot or tab.
There are many different ways to widen the slot until it fits. Put sandpaper on a popsicle stick and carefully sand both sides of the slot equally until you get the fit you want.
You can use a sharp chisel and remove slivers until you have a good fit. The chisel needs to be very sharp. My chisels are almost never sharp. I hate sharpening so I rarely use this method.
I use the edge of the teeth of the scroll saw blade as a file. I start the saw and very gently run the edge of the teeth along the edge of the slot, removing small amounts of wood. I am not really cutting. I am filing. Try to remove a little from each side of the slot to keep the board centered.

With a bit of care, you can get machine quality joints. The trick is to leave everything proud and sneak up on the fit.

This joint is very tight. It does not have to be a friction fit like this. The glue will take up some room. You don't want the joint so tight that you have to drive it together with a hammer. That will cause too much of the glue to squeeze out and may cause a bad joint. If you want a glue-free joint the make it tight.
Let me stress that most joints do not need to be this tight. The glue will cover up some sloppiness. The idea here is to know that if needed you can get extremely tight joints consistently.
When I show techniques like this I enjoy hearing how you do them different or the same. Feel free to drop me an email and tell me what works for you.

$12 per sheet of 12 coins plus $3.50 shipping
Inlay with a 1" Forstner Bit.
The perfect way to sign your work.

Email Newsletter Readers: Remember that the Newsletter is just a copy of the daily blog post. To see the post in its proper formatting click this link. If you ever misplace a pattern or any item you see here you can always find it on the blog. Everything stays on the blog forever.
Products for your consideration:
Every Scrollsaw Workshop Pattern from 2007-2019 on DVD

This DVD has over 2,900 patterns published from 2007 thru 2019.
The DVD is $20 plus shipping. Ships to 60 countries around the world.
The DVD is $20 plus shipping. Ships to 60 countries around the world.
If you use the DVD on a Windows PC there is a simple viewer program to browse through the patterns.
The DVD also works fine on a MAC. The viewer program is not MAC compatible but there is an included PDF with all the patterns shown as thumbnails for easy viewing.
All the same files but in an easy to use thumb drive. The USB thumb drive option is $23 plus shipping.

Now Available on USB Thumb Drive
Don't have a DVD drive on your new computer. No problem. Buy the catalog on a USB thumb drive.All the same files but in an easy to use thumb drive. The USB thumb drive option is $23 plus shipping.


Want to create beautiful wooden vases on the scroll saw?
My two "Wooden Vases on the Scroll Saw" books make it easy.
The books are $12 each and available for instant download after purchase. Click for Video Demonstration.

My Sponsors:

Support the businesses that support our community.
Home of Pegas scroll saw blades.

 Ad: Affiliate
DEWENWILS Extension Cord Reel with 25 FT Power Cord, Hand Wind Retractable, 16/3 AWG SJTW, 4 Grounded Outlets, 13 Amp Circuit Breaker, Yellow/Black, UL Listed
- 【 25 FT Durable Extension Cord 】 Electric cord reel comes with 25 feet long 16/3 gauge SJTW wear and weather resistant extension cord; for indoor/outdoor (dry-location) use only
- 【 Easily Wind and Unwind 】 Extension cord winder features a swivel triangular grip crank handle for tangle free, easy winding; helps to wind the power cord easily into electric cord reel and keep the cords neat and tidy for next use
- 【 4 Built-in Grounded Outlets 】 Rated for 13 amps, 125 volts, and 1625 watts, the heavy duty electrical cord reel power station has 4 integrated 3 prong outlets and allows you to power multiple tools at once
- 【 13A Circuit Breaker 】 Built-in 13A circuit breaker (lighted ON/OFF manual rocker switch) protects devices against short circuit and overloads which will automatically cut off power supply when the total current of the connected devices exceeds 13A; press the red switch to continue using after the cutting off
- 【 Compact and Easy to Carry 】 Weighs 3.12 lbs only; easy to grip handle on top; this handy extension cord wheel is lightweight and portable; very convenient to bring along to a job site or keeping handy in the garage; 1-year warranty and certified to UL