Make A Donation
Monday, March 31, 2008
Fancy Switch Plate
This switch plate is just something I was playing around with. It's a little over the top but I thought I would post it anyway. Hope you enjoy it.
Free Scroll Saw Pattern Download
If you enjoy this pattern and would like to make a donation please click this link
Make A Donation
Make A Donation
Sunday, March 30, 2008
Request from Marshall
Marshall wrote me an email and needed a small easel to hold 4 inch letters. He is making a special project for his granddaughter. This easel is 6 1/2" tall. It is made entirely from 1/4" stock.
If you resize the pattern make sure you adjust the slot and tab for the rear leg so they still fit snugly.
You can probably find many uses for this easel so I thought I would share it with everyone.
Free Scroll Saw Pattern Download
If you enjoy this pattern and would like to make a donation please click this link
Make A Donation
If you resize the pattern make sure you adjust the slot and tab for the rear leg so they still fit snugly.
You can probably find many uses for this easel so I thought I would share it with everyone.
Make A Donation
Bowling Switch Plate
Eltee wrote in requesting a switch plate pattern with a bowler. I thought a few others might like to have it also so here it is. These are easy to make and the last time I uploaded some they were very popular.
Because the back is not recessed like purchased plates you have to make sure the electrical outlet is flush to the wall. Please be safe. If you are not comfortable working with electrical circuits find someone to do it for you.
Free Scroll Saw Pattern Download
If you enjoy this pattern and would like to make a donation please click this link
Make A Donation
Because the back is not recessed like purchased plates you have to make sure the electrical outlet is flush to the wall. Please be safe. If you are not comfortable working with electrical circuits find someone to do it for you.
Make A Donation
Masters of the Sea Plate Set
Here is a pattern book with six very easy plate patterns. All the plates have a sea theme. You can display them on the included display stand or use an off the shelf stand.
These are 7.5" plates. You can back them with colored felt to make the pattern stand out.
Once again I'm a little behind with my emails. If you have not received a reply please be patient and I'll get around to them all soon.
Free Scroll Saw Pattern Download
If you enjoy this pattern and would like to make a donation please click this link
Make A Donation
These are 7.5" plates. You can back them with colored felt to make the pattern stand out.
Once again I'm a little behind with my emails. If you have not received a reply please be patient and I'll get around to them all soon.
Make A Donation
Friday, March 28, 2008
Ron has been busy
I received these pictures from Ron Hewett. These are projects created from patterns here at the Scrollsaw Workshop. Ron modified the utensils by making a set that is two inches longer than the pattern. That was a great improvement from the pattern.
I really like the way he painted the penguin pattern. He took a simple project and made it something special.I like it.
Thanks Ron for sharing the pictures with us.
I really like the way he painted the penguin pattern. He took a simple project and made it something special.I like it.
Thanks Ron for sharing the pictures with us.
Hard To Get
Hello everyone. Just a quick pattern for you all to cut. Hope you enjoy this one.
I am planning to attend the Scroll Saw Association of the World Expo this July in Wilmington Ohio. If any of you are planning to be there keep an eye out for me and say hi. I have not attended this Expo before so if you have any recommendations drop me an email. Hopefully I'll see some of you there.
Free Scroll Saw Pattern Download
If you enjoy this pattern and would like to make a donation please click this link
Make A Donation
I am planning to attend the Scroll Saw Association of the World Expo this July in Wilmington Ohio. If any of you are planning to be there keep an eye out for me and say hi. I have not attended this Expo before so if you have any recommendations drop me an email. Hopefully I'll see some of you there.
Make A Donation
Wednesday, March 26, 2008
Zen Garden
A Japanese Zen garden, is an enclosed shallow sandpit containing sand, gravel, rocks, and occasionally grass or other natural elements. The main elements of Zen Gardens are rocks and sand, with the sea symbolized not by water but by sand raked in patterns that suggest rippling water. Plants are much less important (and sometimes nonexistent) in many Zen gardens. Zen gardens are often, but not always, meant to be viewed from a single, seated position. Some Westerners believe that Zen gardens can be used to calm human minds, but they were not intended for such in their native Japanese settings.
This project can easily be finished in a single day. The entire project uses 1/4" and 1/2" wood. The patterns are easy to cut so if you are a beginner this might be and interesting project to build.
I bought 1/2 pound of sand and some decorative rocks at Michaels Craft store for about $4. I enjoyed building this project because it is something different. Let me know what you think about it.
Make A Donation
Monday, March 24, 2008
Scroll Saw Goodies Blog
This will be old news for many of you but if you have not visited Scroll Saw Goodies Blog you are missing out. Travis writes the blog and is a very active blogger. Travis scours the web looking for information relevant to scrollers. You never know what he will come up with. Travis has a very polished writing style and every post is interesting and well thought out.
Take some time to visit his blog and subscribe. It costs nothing to subscribe and you will get almost daily emails about the hobby you love. I think Travis and I have blogs that compliment each other very well. Between the two blogs we can keep you busy scrolling and enjoying your scroll saw year round.
While you are there make sure you drop Travis an email and say hi.
Sunday, March 23, 2008
Dance Band Mini Clock Pattern
Here is a mini clock pattern for the Ipod Crowd. This pattern requires the 1 7/16" clock insert. Space the layers an inch apart so you get the shadow from the dancers falling on the band.
Free Scroll Saw Pattern Download
If you enjoy this pattern and would like to make a donation please click this link
Make A Donation
Make A Donation
Saturday, March 22, 2008
The Bull Rider Pattern
I am still receiving emails about rodeo patterns so I thought I would post one more. Norm came up with this layered bull rider pattern.
If you have problems matching up the layers you might consider stack cutting the layers to cut the outside then separate and cut the interiors.
Free Scroll Saw Pattern Download
If you enjoy this pattern and would like to make a donation please click this link
Make A Donation
If you have problems matching up the layers you might consider stack cutting the layers to cut the outside then separate and cut the interiors.
Free Scroll Saw Pattern Download
Make A Donation
Friday, March 21, 2008
Desktop Wallpaper
If anyone would like to have my Woodworker Guy desktop wallpaper, click the links below and let the wallpaper open. RIGHT CLICK the mouse on the picture and select SET AS WALLPAPER.
1024 x 768
1060x1200
1680x1050
1024 x 768
1060x1200
1680x1050
Noah's Ark Puzzle Pattern
Several readers have emailed asking if the Noah's Ark pattern is available. The designer is Philip Lowndes from Great Britain. I emailed him to ask if the pattern was for sale. He said that if he got enough interest in it he would get his templates out and make a pattern. I don't want to post his email on the blog because of spam spiders so here is his website link. You can find his email address at the bottom of his main page.
Folks I have seen a bunch of scroll saw patterns in my life. This one is a seller. If you do craft shows you should email Philip and convince him to make this pattern available. Heck even if you just want to make an heirloom toy for a family member you should email him.
I guess you can tell I really like this pattern. To me it is special because it is unique. When you do craft shows you need something to make people want to walk into your booth. Even if this is out of their price range you have them interested. Then they might buy your ornaments or mini clocks etc. Just my two cents.
Thursday, March 20, 2008
Pictures from Philip
Check out this 3d layered puzzle from Philip. I have never seen a pattern quite like this. The pattern is unique and the painted animals are really well done. Thanks for sharing this with us Philip.
Layered Pattern from Norm
Norm sent me this nice layered pattern to share with everyone. Norm is still recovering from his accident and is keeping busy designing patterns. Get well soon Norm and thanks for the great patterns.
Free Scroll Saw Pattern Download
If you enjoy this pattern and would like to make a donation please click this link
Make A Donation
Make A Donation
Scanning and Organizing Paper Patterns
I received an email from Debbie in Texas asking about organizing paper scroll saw patterns from magazines and books. I thought others might be interested in how I go about this.
The thumbnail viewer I show in the video can be found at this link
Tuesday, March 18, 2008
Automaton
Check out this video of a great automaton I found posted on YouTube. The artists name is Philip Lowndes. He lives in Great Britain. Take a minute to visit his website. This is one of my favorite automatons I have ever seen. I love the intermittent movement and detail.
Here is a quote from the artist web page.
"I try with each automaton to express as much emotion as is possible from essentially pieces of wood. This involves subtle movements with complex gears and cams to ensure accurate movement and timing. Although constructed almost entirely from wood each automaton is designed to run smoothly with only a light touch needed on the handle.
I make all my automata in my workshop in East Anglia and I am happy to offer ideas for commissions for window displays, museum exhibits, retirement gifts, wedding presents etc."
If you are viewing this from the email newsletter you may not see the video. Depending on the security setting of your email client it might be blocked. Just visit my blog to watch this video. Scrollsaw Workshop
Business Card Holder
This business card holder from Norm Benjamin will look nice on any executives desk. This should be a nice reminder that after a busy week at work they can unwind with their favorite game.
The picture does not show this pattern very well. Download the pattern and take a closer look. I think Norm did a nice job on this one.
Free Scroll Saw Pattern Download
If you enjoy this pattern and would like to make a donation please click this link
Make A Donation
The picture does not show this pattern very well. Download the pattern and take a closer look. I think Norm did a nice job on this one.
Make A Donation
Monday, March 17, 2008
Rodeo Time Clock from Norm
The rodeo pattern I uploaded the other day was more popular than I thought it would be. Here is another one for you rodeo fans to cut. This one is from Norm Benjamin. He likes designing clocks and he likes rodeo so this one came out real nice.
You will need a 2" clock insert for this pattern.
Free Scroll Saw Pattern Download
If you enjoy this pattern and would like to make a donation please click this link
Make A Donation
You will need a 2" clock insert for this pattern.
Make A Donation
Saturday, March 15, 2008
Block Puzzle Pattern
This is a little puzzle you can sit on your desk to challenge visitors. Most people will need a few minutes to put it together. It's easy to make and does not require much wood. I used oak for the puzzle and walnut for the frame.
After making this puzzle I wish I would have cut the puzzle pieces for walnut so they would contrast from tray and match the frame.
Everyone have a nice weekend and go make some saw dust.
Free Scroll Saw Pattern Download
If you enjoy this pattern and would like to make a donation please click this link
Make A Donation
After making this puzzle I wish I would have cut the puzzle pieces for walnut so they would contrast from tray and match the frame.
Everyone have a nice weekend and go make some saw dust.
Make A Donation
Chinese Dragon Clock
I've been working on this clock for a while. I think I have it about where I wanted to go with it. I have not cut this pattern yet. I think it is going to need to be at least 1" thick to look right.
The pattern requires a 3 1/2" clock insert. You can buy the inserts from www.clockparts.com.
Free Scroll Saw Pattern Download
If you enjoy this pattern and would like to make a donation please click this link
Make A Donation
The pattern requires a 3 1/2" clock insert. You can buy the inserts from www.clockparts.com.
Make A Donation
Friday, March 14, 2008
Easy Animal Puzzles
This pattern book has a couple stand-up jigsaw puzzles. These are always fun to make They should be cut from 3/4" stock.
Anytime you cut puzzles use the thinest blades that the wood will allow. Make sure you adjust the blade to 90 degrees to the table.
Free Scroll Saw Pattern Download
If you enjoy this pattern and would like to make a donation please click this link
Make A Donation
Anytime you cut puzzles use the thinest blades that the wood will allow. Make sure you adjust the blade to 90 degrees to the table.
Make A Donation
Another video for creating ornaments in Photoshop
The video cover Tim's technique. He also sent me written instructions that you can download from the following link.
Instructions
Wednesday, March 12, 2008
Letter Opener with Clock
This pattern is a letter opener that has a mini clock insert. The stand is designed to make sure the blade stands up straight.
I left the base plain so you could scroll the initials of the owner and apply them to the front. I included a font in the pattern but if you like a different font just use a word processor to create your own initial patterns.
Make A Donation
More from Norm
Norm has been busy designing more of his great clocks. The Elf clock uses a 3 1/2" clock insert. This clock will be a fun challenge to cut and will make a nice mantle clock
The butterfly clock uses a 2" clock insert. Both clocks need a base sized proportionally.
Thanks again Norm.
Free Scroll Saw Pattern Download
Make A Donation
Sunday, March 9, 2008
Thanks Norm
Norm Benjamin wanted to share one of his 2" clock patterns with everyone. This pattern needs a 2" clock insert to complete.
Norm recently had an accident and broke his shoulder. He is going to be out of commission for a while. Everyone wish him well in his recovery.
Thanks Norm and get well.
Free Scroll Saw Pattern Download
If you enjoy this pattern and would like to make a donation please click this link
Make A Donation
Norm recently had an accident and broke his shoulder. He is going to be out of commission for a while. Everyone wish him well in his recovery.
Thanks Norm and get well.
Make A Donation
8" Young Love Plate
Here is an 8" plate pattern. You should use contrasting woods to make the pattern stand out better. The outer rim is 1/4" thick wood. You might need to glue up a panel to get the required 8" diameter. The inner plate should be cut from 1/8" wood.
The plate can be displayed on a stand or hung on the wall.
Free Scroll Saw Pattern Download
If you enjoy this pattern and would like to make a donation please click this link
Make A Donation
The plate can be displayed on a stand or hung on the wall.
Make A Donation
Saturday, March 8, 2008
I Love Rodeo
I received a request from a rodeo fan for a pattern. Hopefully there are a few other rodeo fans out there that will enjoy cutting this trophy also.
We are having a nice little ice/snow storm here in Kentucky tonight. They were talking about 6 to 8 inches possible. That's just about enough to give an excuse to stay in the workshop all day.
Free Scroll Saw Pattern Download
If you enjoy this pattern and would like to make a donation please click this link
Make A Donation
We are having a nice little ice/snow storm here in Kentucky tonight. They were talking about 6 to 8 inches possible. That's just about enough to give an excuse to stay in the workshop all day.
Make A Donation
Thursday, March 6, 2008
Child's Prayer
Child's Prayer pattern for Mothers Day or just because.

Free Scroll Saw Pattern Download
If you enjoy this pattern and would like to make a donation please click this link
Make A Donation
Make A Donation
Tuesday, March 4, 2008
Carter Johnson, Puzzle Maker
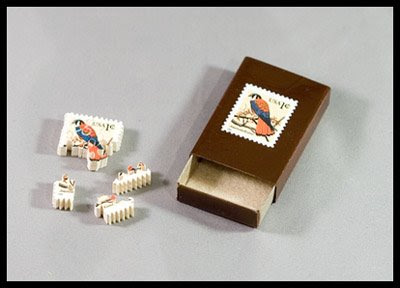
I received this puzzle in the mail from Carter a couple days ago. This is one of those things you have to see in person to appreciate. The freehand scroll work is incredible. Carter presents his stamp puzzles in a decorated match box. All I can say is thank You Carter for such a wonderful gift.
For those of you who would like to get some insight as to how Carter creates his wonderful puzzles I have included his video demonstration and a writeup of his technique. Enjoy
From Carter Johnson:
Hi folks....I’ve had some requests to write instructions for cutting freehand, line-cut jigsaw puzzles. For those of you that are flat-out not interested, feel free to tune out now so you won’t be bored with what follows. For those of you who want to give this a try, read on. For those of you who work with complex projects, this is a pretty simple process but, if something is confusing, feel free to submit questions to me at CarterJ636@aol.com
To show you what I’m talking about, here’s a link to one of my Picture Trail albums showing different kinds of puzzles.
Gallery One
Gallery Two
So,,,,to start, here’s what you’ll need...
Pictures can be taken from almost any source, provided the paper is at least 20lb and preferably the weight of a magazine cover or greater. I take most of my pictures from calendars, cards and photos.
Blades: I use Flying Dutchman 2/0 “Superior Puzzle” blades . " Ultra Thin Puzzle Blades " (narrow kerf ) from Pegas , Shark and others also work well. To me, regular 2/0 blades cut pieces that are too loose.
Wood: All 1/4” - Probably my favorite wood is 5-ply poplar, which I get from Wildwood Designs. I also use Baltic Birch (harder to cut), oak, cherry and aromatic cedar. The poplar, for some reason, produces pieces with a tighter fit.
Glue: I use Aileen’s Tacky Glue, spread thinly and evenly with a plastic scraper. Any yellow wood glue will work almost as well. Some folks use sprays, but, to me, that’s a little messy.
Finishing spray: I use any Triple-Thick Clear Glaze. The best I’ve found is at Hobby Lobby under the brand name Crafts, Inc. (black label). Krylon makes a similar spray that is more widely available but it takes a longer time to dry. (Note: I do not spray glossy photos.)
* * * * *
Step #1 - Select picture. I deliberately select pictures that have color image lines within them that I can use as edges of pieces.
#2 - Glue to wood. Spread a thin and even coat of glue on the wood and smooth picture down slowly from one corner to its opposite. Stay close to the glued picture for 20 minutes, checking it frequently and smoothing down edges and any bubbles that appear.
#3 - When glue is dry (4+ hours), cut picture around edges. I cut a straight border if the picture has one I want to keep. Otherwise, I cut a randomly wiggly border. Don’t worry about making a mistake. You can’t!
(At this point, I take a digital picture of the puzzle. On the computer I reduce it to about 4 x 5 inches and print it out.)
#4 - Spray picture. One thick coat of the Triple-Thick Glaze is sufficient
#5 - Cut pieces, each with 2, 3 or 4 locks to adjoining pieces. I start at the upper right corner with a piece that has locks on each edge side. When you finish a piece, take it out and set it aside. When you encounter an image or color line within the picture, use its edges as the edges of puzzle pieces, remembering still to insert locking tabs.
A couple hints: a) Don’t worry about pieces not being the same size. They don’t have to be. b) Try to avoid having four pieces exactly meet at their corners. It makes the puzzle too loose.
When you’ve made 30 - 40 pieces, stop. Sand the backs of the pieces quickly either with sandpaper or with a sander held upside down in one hand while you touch the backs of pieces to it with the other. Then put those pieces together.,,,,and launch into cutting another batch....or forget it for the moment and find something else to do. You’re not running a race.
And please....please....dont use a pattern. If you want to insert certain shapes for pieces, trace those shapes when cutting them, but don’t use a pre-set pattern for the rest of the puzzle. No matter what your experience tells you, you do not need it!
#6 - When you’re finished cutting, flip the puzzle over and give the back a quick sanding. Take dust off the back and the front by flapping a damp sponge over the surfaces.
#7 - Take it apart, count the pieces, give it a name and write it down on the front of a baggie to put the pieces in and on the back of the photo you took earlier.
#8 - Give it to someone to put together, along with the little picture you took.
#8 - Start another one...........and above all, HAVE PHUN.
Carter
A note from Steve:
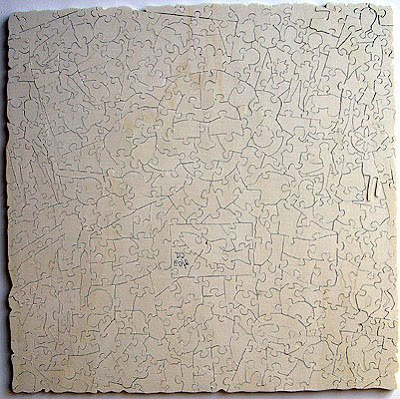
I wanted everyone to notice how Carter cuts along color lines. Look at the following puzzle. Notice the back of the puzzle. You can clearly see how he followed the color lines.
Carter has developed a style all his own. This is something to shoot for if you want to make puzzles.
Thanks again Carter for sharing you talent.
Saturday, March 1, 2008
Scanning Clip Art to Create Scroll Saw Patterns
After you watch this video you might think I'm cheating. Okay I am but who's counting. I'm going to show you how to create scroll saw patterns in Corel Draw. Even if you think you have no artistic tallent at all. If you plan to sell or share your patterns make sure you use royalty free sources of clip art.
Make A Donation