 This is the second book in a series of sports patterns. The book contains several different cities of hockey teams. There is also a blank to customize your own pattern. A link to the font needed is in the book
Make A Donation

Welcome to the Scrollsaw Workshop. You will find FREE scroll saw patterns, video demonstrations, scroll saw links, reviews, and much more. Sign up for the email newsletter so you won’t miss a single post. Thank you and remember to set a bookmark.


This is the second book in a series of sports patterns. The book contains several different cities of hockey teams. There is also a blank to customize your own pattern. A link to the font needed is in the book
 Okay I know this is a little random but I wanted to get away from all the Holiday patterns. I have been promising a few readers to do this pattern book for months. There are patterns for every team in a certain league that shall remain nameless.
I also included a blank so you could add your own name. Maybe a high school or college team. You could also put the name of a favorite player and their number.
You can download the font I used here. Install the font and use you favorite word processor to print out the name. Set the font size to about 80 and test the fit.
 After reviewing the Inlace liquid inlay product I received a few email suggesting I try making my own. I have done this before with limited success but it has been a while so I thought I would experiment a little. The key chain above is my attempt at creating a mixture that simulates granite inlay.
 I purchased a a tube of Loctite gel two part 6 minute epoxy and a small bag of ornamental sand. The sand is brown with white mixed in.
I cut and glued together the dolphin key chain from the book I posted the other day.
I also have a small cup and wooden stir to mix the inlay. I put several drops of the two part epoxy in the cup. This gel is very thick.
 I mixed in the sand and stirred the mixture well. The gel was too thick to pour into the dolphin cut out so I just packed it in as tight as I could.
 I waited 1/2 hour to let the epoxy set. I should have waited much longer. The epoxy was set up hard on the surface but as I sanded the inside was sill a little tacky and made a mess on my sander. I was able to sand it flush.
 This picture shows the sanded but unfinished key chain.
Conclusion:
I would say that this technique works but with issues. The Gel Epoxy was too thick. I will try the thin epoxy next and see if that helps. The brown and white sand looks a little muddy. Not the granite effect I was looking for but close. It ended up looking more like sand stone. That makes sense I guess.
Sanding the hardened epoxy was much more difficult than the Inlace material. It stuck to the belt and made a mess. Maybe if I had let it cure over night it would have worked better.
After this experiment I would still spend the money for the Inlace product. Inlace sands better and looks much better.
More experiments to come.
 Here are a few welcome signs to cut.
Hope everyone had a nice Christmas. I want to thank everyone for the emails wishing my family and I a merry Christmas. I'll never be able to answer all the email but I have read them all and appreciate them greatly.
 This is the finished key chain from the last post. The video below shows how I finished the project.
I received a few email telling me that you can make your own liquid inlay material from two part epoxy and sand. I have also done this myself and it does work but I have to say I like the Inlace product better. The turquoise effect is very realistic. I think they use crushed turquoise in the mixture. It works, it looks good, so I don't mind spending the money for a product I like.
 The two key chains on the left have a liquid inlay material by the name of Inlace. The product is easy to use and adds a little uniqueness to projects.
 Here is a little closer look at the inlay material. Inlace comes in several different colors and textures. The one pictured is turquoise. The effect is very realistic. The product sands easily and finished to a nice shine even with 220 grit sand paper.
 The pattern book below contains several patterns. They are cut from 1/8" think contrasting hardwoods. In the picture above you see a front and back view. The pattern is cut from the lighter wood then glued to the darker back. The Inlace is optional and the key chains look nice with out it also.
 Inlace is a two part resin. It is mixed with a hardener and dries overnight. After it is dry it can be sanded and and polished to a nice sheen. The two part video below demonstrates how the product is used. Inlace can be purchased from some Woodcraft. Stores. You can also purchase it here.
Part One:

This Antique Car mini clock pattern requires a 1 7/16" mini clock insert.
 Many of you wrote to answer my question about the DeWalt DW788 thumb screw upgrade question. A few readers suggested the Quick Clamp Lever from Grizzly. I ordered one last Thursday and received it today. The cost of the lever was $2.95 and shipping to Kentucky was $7.70. Shipping was a little high so I would suggest ordering more than one lever. If you damage one you will have a spare. If you are in a club maybe you could go together and split the shipping cost. The picture above shows the male and female clamp. You will only need the male and that is what is shipped from the link above.
 This picture shows the length of the bolt as shipped. It was too long and needed to be modified.
 I determined that the bolt needed to be 1/2" long. I marked the length with blue painters tape so I would not accidentally make it too short.
 I decided to use the grinder to shorten the bolt. It would have been easier to use the hack saw but mine was buried somewhere not to be found. If you use a hack saw be very careful not to mess up the threads too much. You will need to use a grinder to get a nice final flat surface. Make sure the end is flat and level or you may have trouble with blade slippage. If your saw starts breaking blades or significantly bending the ends of the blade check that the bolt end is flat.
 This picture shows the finished length of the bolt ready to install. The bolt is now 1/2" long.
 Carefully insert the bolt to make sure you do not cross thread and destroy the upper clamp housing. Go slow and if you feel any resistance back it out and check the threads on the bolt. Mine went in easily with little resistance. Careful grinding goes a long way to prevent problems here.
 After you have tightened the clamp to the blade push in on the button and set the lever to a position that will not obstruct your cutting.
Easy to make Christmas ornament stand. Display those special Christmas ornaments on this stand.

I cut this pattern from 1/4" MDF and spray painted with green and metalic gold paint.

This small shelf can sit on a vanity or hang on the wall. There are four different designs to choose from. All pieces are cut from 1/4" thick stock. The construction is slot and tab for easy assembly. The shelves are about 10" long. Adjust the shelves to any length you need.

I want to thank everyone for answering my question in yesterdays post. I am still looking for a new handle for the DW788. When I find a source I will pass it on.
In the mean time several readers sent the suggestion below. I received 4 different designs for a home made replacement handle. After looking at the different pictures I decided to make a pattern of the one I liked the best.
The problem with the existing thumb screw is that it can be painful after extended use. Many of you have told me you have arthritis which cause even more discomfort.
This design simply adds a wooden handle to the existing thumb screw. Nice simple solution. I cut this one tonight and it works very well with my initial tests. I cut this handle from 3/8" Baltic birch ply for strength. You need to cut the opening carefully for a tight fit. After you cut it out sand all the edges to a nice smooth feel.
One note of caution is to make sure the handle is positioned up and out of the path of the down stroke. You don't want the new handle hitting your finger. Even with the correct position the handle is a little lower so take care when cutting thicker stock.
The new handle adds more leverage so be careful not to over tension the blade.
 Tensioned
A reader brought this video to my attention tonight. He was wondering where he could find the upper blade clamp handle on this modified DW788. I have looked at Woodcraft in the past for something similar with no luck. The small standard thumb screw can make your fingers sore after hours of use and this handle looks more comfortable. If any of you have information about this I would appreciate hearing from you.


There are six patterns in this book. These can be cut from wood or medium density fiberboard. The MDF can be painted for a nice effect. There are spray paints that simulate stone and metal that would look interesting.
These cuttings are a bit fragile until mounted to a wall or backer board.
MDF puts of a lot of small dust particles in the air as you cut. You should consider wearing a dust mask anytime you use your saw but it is an especially good idea with MDF.

Simple Christmas mini clock pattern. Requires a 1 7/16" mini clock insert.

Here is a sign for your front door.
 I received these pictures from Sherry Fulton a couple days ago. She cut these puzzles from pictures of her grandchildren. As soon as I saw these I asked her to get permission form the parents to share these with everyone.
The reason I like these puzzles so much is they are perfect for preschool children. They are fun and educational at the same time. Simple and exceptional.
If you look closely at the pictures you will see that these are tray type puzzles. This makes it easier for small children to put together. The picture is adhered to the ply the pieces are cut. Then the puzzle is glued to a backer board.
I like just having the letters but you could also add simple shapes to the cut outs.
For those of you that cut custom projects to sell I suggest you add this to your menu. I really believe mothers would have a difficult time saying no to these. This project has the advantage of being cheap and fast to produce. That equals more money in your pocket with less time at the saw. This is something that I try to explain to scrollers all the time. It's great that you can cut an advanced fretwork clock that takes over 100 hours to cut but just try to sell it for a reasonable profit. It's almost impossible. Real money makers are usually projects that have more appeal than just your skill at the saw.
Let's face it, women purchase 70 to 80 percent of crafts that are sold. They don't care that you have a $1500 state of the art scroll saw and use #2 reverse tooth blades. They don't care that you have to use a 5x magnifying glass to see the pattern lines. They will politely listen to all of this but if the project does not match their kitchen decor your not going to get the sale. This project has more value than the effort and skill required to make. That equals profit.
Thanks Sherry for allowing me to show your projects. These truly are wonderful. I know you are just getting started with the scroll saw but your eye for project appeal is great and that's way more important that your skill at the saw.


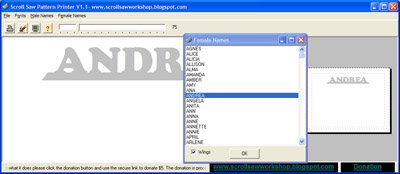
 Use the Scroll Saw Keychain Maker to start a small keychain business. Build yourself a nice display and make up severl keychains with common names. Sell at craft shows, on Ebay or at work. Everyone needs a keychain. Take custom orders. Heck just make them and give them away as gifts. It's all made easy with the Scroll Saw Keychain Maker.
Watch the video demonstration then download the file below and get started with the fun.
Use the Scroll Saw Keychain Maker to start a small keychain business. Build yourself a nice display and make up severl keychains with common names. Sell at craft shows, on Ebay or at work. Everyone needs a keychain. Take custom orders. Heck just make them and give them away as gifts. It's all made easy with the Scroll Saw Keychain Maker.
Watch the video demonstration then download the file below and get started with the fun.

