


 I know some of you have never used flocking before so I'm going to show you just how easy it is. You will need flocking material, undercoat adhesive, mini flocker, painters tape, paint brush and your project. If you don't have a local source you can find what you weed at Woodcraft online. You are going to pay about $45 for everything but it will complete many projects.
 I always mask off the rim of the box just to make sure I have a straight line. You are going to paint the adhesive on so the tape prevents mistakes.
 When you buy the flocking kit you can select from a few different colors. Make sure the adhesive and flock material you buy are the same color. I'm using bright red for this project.
Open the can and stir it well. The next step is to pour the flocking material into the mini flocker. Don't be stingy because its easy to recover the extra material when you are finished. The mini flocker works like an air pump. When you push the two pieces together it sprays a light mist of flocking out the holes in the top. This helps get a nice even coverage.
 Assemble the two pieces of the mini flocker and set it aside for a moment.
 Now you want to paint the interior of the box with the adhesive. Apply it generously and make sure you cover every spot. When you paint the side wall the tape will give you a nice straight line. This stuff has a long drying time so there is no big hurry. Take your time and be neat.
 Once you have the interior of the box completely covered you are ready to start flocking.
 Using the mini flocker is a two handed operation. I am holding the tool with one hand here because guess who is taking the picture. Gently use both hands to push and pull the mini flocker together. A fine mist of flocking material will start to cover the area and stick to the adhesive.
 Put the stuff on thick. Nothing will be wasted because once the adhesive is dry we will shake the excess off on a piece of paper and recover what falls off.
 The flock will make a bit of a mess so lay some paper down to catch the extra. This can all be recovered back into the bag also. No reason to waste any.
Now for the hard part. You have to let the adhesive dry for 15 hours before it is ready to have the excess removed. The next day pick the box up and shake and gently tap it upside down on a piece of paper until all the loose flocking falls off. You will be left with a nice even covering and the box is ready to use.
 Flocking can add that extra touch of quality to your work. It does not add much extra time to the project and the cost is pretty low per use. It is one accessory I always keep in my shop.
Thursday, February 17, 2011
Flocking a small box.
Is Etsy worth the effort?
 I generally focus most of my attention on the hobby side of scrolling. Selling handmade crafts can be very difficult. Making a living from hand made crafts even more so.
I receive a huge number of emails from scrollers looking to set up shop online. They want advice. I try to give advice from my experience and from my research. I do have enough experience and have done enough research to be at least a little helpful. Unfortunately even the most skilled craftsmen and women will tell you it's difficult and time consuming to be successful.
One frequent email I receive is about the online crafts market ETSY.com . Etsy is an online market place where makers of handmade items and buyer are put together. Craftsmen sign up for a store front and post pictures of their work hoping for sales. There is a 20 cents posting fee for each individual item and a 3.5% transaction fee. Each item is listed for four months and then it is either removed or you pay to have it listed again.
Buyers come to etsy and browse through different directories looking for items to purchase. When the buyer finds what they like they add it to their shopping cart. The buyer is given the option to pay with a credit card, Paypal account or money order. The seller receives the order and ships the merchandise. Seem like a match made in heaven, or is it?
Setting up an online presence takes patience and hard work. It's relatively easy to get your products online especially with sites like Etsy. The hard part is getting eyeballs to see your stuff. That's the good and bad news about sites like Etsy. They have thousands of eyeballs coming to the site every day but they also have thousands of listings for sale. It's easy to get lost in the masses.
If you do a little research about Etsy you will finds lots of people complaining about poor communications from the sites administrators. Sellers want more fraud protection. They want better search capabilities. The list goes on and on. You will also find sellers who are very pleased with Etsy. This diversity of opinion is common on sites like this. This has been and ongoing battle at Ebay for years.
There are no hard fast rules to make you successful selling products online. There are a few common sense things that are always important though.
Your product needs to have something that says buy me. Sometimes that something is the pure art of it. Sometimes it's novelty and sometimes it's value. Without sounding harsh it's hard to sell a poor product.
You can't post a product and set back and hope for sales. You might get a few bites here and there but you will usually just be lost in those masses I mentioned. You have to get the word out at every opportunity. Participate in online forums where people who might be interested in your product are. Make sure your online signature includes the link to your store. Every email you send out should have the link to your store at the bottom.
Make an artist video and post it on YouTube. You will be amazed how many people will find your store from the video. Make sure the key words you add when uploading the video are good solid search phrase.
Start a blog and present your work. Talk about yourself as an artist. Let the reader get to know you. Post often. Google will find your blog and the more you post the more people will come.
Update your Etsy store often. This keeps you at the top of the daily lists and keeps you visible. Unfortunately it also cost you more fees but sometime you have to spend money to make money. It's a trade off.
Patience, patience, patience. Most online sellers get discouraged quickly and give up. Be prepared to wait several months for sales to start coming in. It takes time to build a following. You need repeat customers and that does not happen quickly.
Only post your best work. One poor item can be a turn off to buyers. Make sure the photo represents your product well. It needs to be well lit. No clutter in the picture. Preferably a solid background. Everything in perfect focus.
I have said this before but I'll say it again. Find your niche. Don't just post a bunch of random items. Find a good mix of products that compliment each other. Sell something no one else is selling. Stand out in the masses. Be different. Be excellent.
To answer my original question "Is Etsy worth the effort?". A lot of that depends on the effort you put into it. It depends on the products you are trying to sell. Several years ago I was taking classical guitar lessons. Classical guitarist use a foot rest while playing. The ones you could buy were generally not very attractive. I started making wooden foot rests with scrolled patterns in the side. They took about an hour or less to make. I posted a few of them on ebay. They sold in the $50 range sometimes a little more. I stared getting requests from people that saw them on ebay wanting custom rests made. The postings on ebay led to the custom orders. I made a nice chunk of fun money from those foot rests. I was the only one selling an item like that on ebay at the time. I used good search words and when a classical guitarist saw them it was easy to make a sell. I had a niche.
I hope this gives a little insight into Etsy. I'm not recommending or discouraging anyone from joining Etsy. The success stories will always be outnumbered by the failures but that does not mean you can't be the success story.

Seyco

Free Pattern Catalog. 1000's of free patterns.

Thousands of FREE scroll saw patterns. No registration or signup required.
The projects form these patterns can be sold without restrictions. The patterns cannot be sold.
Stencil Printer 1.7


Scroll Saw Pattern Printer update 1.1
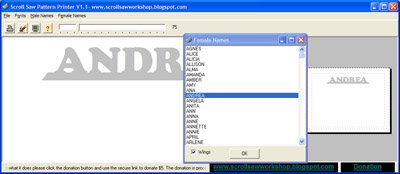
Scroll Saw Keychain Pattern Maker
 Use the Scroll Saw Keychain Maker to start a small keychain business. Build yourself a nice display and make up severl keychains with common names. Sell at craft shows, on Ebay or at work. Everyone needs a keychain. Take custom orders. Heck just make them and give them away as gifts. It's all made easy with the Scroll Saw Keychain Maker.
Watch the video demonstration then download the file below and get started with the fun.
Use the Scroll Saw Keychain Maker to start a small keychain business. Build yourself a nice display and make up severl keychains with common names. Sell at craft shows, on Ebay or at work. Everyone needs a keychain. Take custom orders. Heck just make them and give them away as gifts. It's all made easy with the Scroll Saw Keychain Maker.
Watch the video demonstration then download the file below and get started with the fun.
Download the Oval Keychain Pattern Maker.

The Scrollsaw Workshop Blog is in no way affiliated with or sponsored by Scroll Saw Woodworking and Crafts Magazine formerly (Scroll Saw Workshop Magazine) or it's publisher Fox Chapel Publishing.
Scroll Saw Woodworking and Crafts
